Sunday, 10 June 2018

Sling Servlet POST request throwing 403 Forbidden Error

Namastey,

If you are working on your local machine and have created a sling servlet to make post request to local AEM Server , you may be getting 403 Error Code : Forbidden

This issue is due to CSRF Filter blocking POST Requests.

You can unblock this via OSGi Configuration. You shouldn't be doing it on production instances.


  1. Go to http://localhost:4502/system/console/configMgr
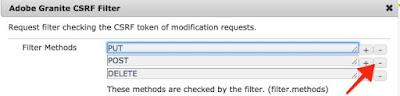
  2. Find Adobe Granite CSRF Filter 
  3. Remove POST from Filter Methods
  4. Save and Test the servlet again.


Now let us try to understand 

  • Cross-Site Request Forgery (CSRF) is an attack that forces an end user to execute unwanted actions on a web application in which they're currently authenticated.
  • Adobe also provides a new CSRF Protection Framework to protect against this type of attack.
  • The framework makes use of tokens to guarantee that the client request is legitimate. The tokens are generated when the form is sent to the client and validated when the form is sent back to the server.


Refer following for more details 
https://helpx.adobe.com/experience-manager/6-4/forms/using/admin-help/preventing-csrf-attacks.html


Dhanywaad

Thursday, 17 May 2018

Remote Debugging in AEM 6.4

Namastey,

There are situations when you want to do debugging of OSGI java code while it is running on your AEM.

There are two parts to it : 

  1. AEM server should be enabled to accept remote debugging connection
  2. Eclipse IDE / Intellij should be configured to make remote debugging connection to AEM
Start AEM JAR with following command


java -Xmx2g -agentlib:jdwp=transport=dt_socket,address=5402,server=y,suspend=n -jar cq-author-p4502.jar 


-Xrunjdwp loads the JPDA reference implementation of JDWP
  • transport-dt_socket is the name of the transport to use in connecting to debugger
  • server=y  > means listen for a debugger application to attach
  • address=5402  > means listen for a connection at this address (no host = this port on add interfaces)
  • suspend=n  > means do not wait for a debugger to attach

Add Debug Configuration in Eclipse
  • click on debug configuration 
  • Select Remote Java Application
  • Add Configuration 
  • In the new configuration, select project and provide  aem host and aem port

Now setup some break points in java code ( except JSP)
Run your program and eclipse should ask you to enter debug mode.


Dhanywad

Wednesday, 7 February 2018

HTL Basic Examples

Global Objects
  • page 
  • currentPage
  • properties
  • inheritedPageProperties
  • currentDesign
  • currentSession
  • wcmmode
Refer for list of global objects


Converting JSP Method into HTL

  • JSPcurrentPage.getContentResource()).getResourceType()
Remove() from JSP methods

  • HTL 1 :  ${currentPage.getContentResource.getResourceType}
OR Simply Remove get from method name
  • HTL2${currentPage.contentResource.resourceType}


HTL Examples

Get title of page using HTL

  • ${page.title}
Get any custom property from page using HTL
  • ${page.getProperties['root/responsivegrid/content/customPropertyName']
Handling Property Array using HTL
<div data-sly-list = "${currentPage.getProperties['component/reference']}"> 
${item}
</div>

( reference is property name , component is component node under jcr:content)


Get date using HTL
  • ${ 'dd-MMMM-yyyy hh:mm:ss' @
           format=currentPage.lastModified,

           timezone='IST',

           locale='en'}


Get logged in user using HTL

  •  ${currentSession.userID} 
Get design path using HTL
  • ${currentDesign.path}
Check wcmmode using HTL
  • ${wcmmode.edit}


Wednesday, 29 November 2017

Setting up Dispatcher on Mac OS X

Namastey, 

Setting up dispatcher is one of the most common thing we do in AEM projects. Sometimes developers face issues in configuring it on Mac OS X. 

You can follow below steps and get basic dispatcher setup done. 

Step 1: Install Apache Server on your machine.Verify the version by running.

sudo httpd -version

Step 2: Download Dispatcher Module and sample files as per OS and apache version

Step 3: Extract the downloaded dispatcher module file and copy file "dispatcher-apache<x.y>-<rel-nr>.so" to directory /usr/libexec/apache2/
You can rename the copied file to mod_dispatcher.so 

Step 4: Open httpd.conf from /private/etc/apache2/

Step 5: Add following configurations after last load module. ( it should be around line 170 in default in httpd.conf).

LoadModule dispatcher_module libexec/apache2/mod_dispatcher.so

<IfModule disp_apache2.c>
  DispatcherConfig /etc/apache2/conf/dispatcher.any
  DispatcherLog    /etc/apache2/logs/dispatcher.log
  DispatcherLogLevel 3
  DispatcherDeclineRoot 0
  DispatcherUseProcessedURL 0
  DispatcherPassError 0
  DispatcherKeepAliveTimeout 60
</IfModule>

<Directory />
  <IfModule disp_apache2.c>
    SetHandler dispatcher-handler
    ModMimeUsePathInfo On
  </IfModule>

  Options FollowSymLinks
  AllowOverride None
</Directory>

Step 6: Copy dispatcher.any from downloaded dispatcher module and paste it to /etc/apache2/conf/dispatcher.any

Step 7: Open dispatcher.any and find docroot in the configurations and change the location to match document root of httpd.conf

/docroot "/Library/WebServer/Documents"

Step 8: Run following command to verify configurations. You should get Synatax OK in response .
sudo apachectl start
sudo apachectl configtest

Step 9: Restart apache 
sudo apachectl restart

Step 10: Start author instance on port 4502 and navigate to http://localhost:80 and it should redirect you to author instance.
You can find cached file at "/Library/WebServer/Documents"

For any issues you can tail apache and dispatcher log
/private/var/log/apache2/
/etc/apache2/logs/dispatcher.log

Note: This is basic configuration for author instance using out of the box files available.For more details refer adobe doc [0][1]


Dhanywaad


Friday, 17 November 2017

Apache Webserver on Mac

Quick handy command and details for Apache Webserver on Mac. 

Start Apache
sudo apachectl start

Stop Apache
sudo apachectl stop

Restart Apache 
sudo apachectl restart

Configuration Test
sudp apachectl configtest

Apache Installation Location
/usr/libexec/apache2/

Apache Conf Location
/private/etc/apache2/

Default Doc location
/Library/Webserver/Documents/

Error File location
/private/var/log/apache2/

Host File location
/etc/hosts

You can also get some of these details by running following command
httpd -V

Note: Details from Mac OS X El Capitan / Sierra

Friday, 8 September 2017

Experience Fragments Vs Content Fragment

Namastey & Welcome !

It's quite a common questions these days, What is the difference between Experience Fragments and Content Fragments ?

Its Simple !

A Fragment is useful because we can reuse them on multiple pages and
whenever required you can edit them from one single location.

To differentiate between CF and XF it's important to understand who is the target user.
Experience Fragment is mainly for authors
And Content Fragment is mainly for content writers.


Usually content writers ( e.g. news editors, magazine authors ) are more concerned of writing textual content and provide associated images.

They may worry about creating variations of content for different channel like mobile, print,tablet etc or different variation of content like teasers, summary etc.

Once the content is created, Authors may use the content on AEM Page as authors are more responsible for presenting content in appropriate layout

EXPERIENCE FRAGMENT

Lets take an example, You have contact information section on your AEM page which contains a few custom components like address, phone number and email details and a map view of address. This set of component is a meaningful experience in itself.

You can create this set of component as Experience fragment and then you can use this experience fragment on any number of the pages.

Please let me know if you have any other question.

Dhanywad !

Wednesday, 14 June 2017

Javascript Use API Example


  • HTL ( previously known as Sightly ) focuses on separation of concerns. 
  • UI Developers shouldn't worry about back-end logic as they use to be with JSPs,
  • With HTL back-end logic should come from Java or Javascript.
  • As a HTL Developer , you are provided with Use API  you can simply call logic by data-sly-use operator.
  • Syntax: 
    • data-sly-use.objectName =" JAVA class  /Java script name "
  • An object is created and that object can be used for accessing properties returned by Java or javascript.


Sunday, 21 May 2017

AEM Static Template Vs Editable Template

Namastey, 

Templates are basis of AEM page. Author can create a page using a template . These templates define basic structure of the page, what components can be used on the page and design of the page.

With AEM 6.2 , Editable Templates were introduced to reduce dependency of authors on developers.
In AEM 6.3 Editable Templates are quite a mature and powerful feature.

AEM Static Templates 

  • Static templates are created by developers ( It defines page rendering component , availability of template for authors to create the page ) 
  • Stored in /apps directory of CRX
  • Once a page is created using templates, after that if we make any change in static template it wouldn't affect the page.
  • Design mode is available for applying Page design.

AEM Editable Templates

  • Editable Templates can be created by template-authors ( non-developers ).
  • Stored in /conf directory of CRX
  • Pages created using editable templates would affect if any changes on editable templates are done.
  • Page design is controlled by content and page policies.Hence no design mode available.


Dhanywad.


Create AEM Templates - Everything about AEM Templates

Namastey,

Defining Templates

  • A template is the basis of a page.
  • A Template is like a stencil or frame or blueprint which is used to create multiple pages with same page structure. 
  • Template defines which components can be added on the created page.
  • All the pages having same template is going to have same design.

Steps to create a template 

Step 1. Open CRXDE Lite ( http://localhost:4502/crx/de)
Step 2. Go to your project folder or create one   ( E.g  / apps/training )
Step 3. Create a folder to organise all templates ( E.g templates ) 
Step 4. Right click and select "create template "


Label : Name of the node
Title  : Name of the template
ResourceType : Location of page component which will be used to render the page
Ranking : Order of the template which will be visible to Author.


Step 5 .Click Next and Enter allowedParents : /content(./*)? 
Step 6. Click Next , Next & Finish.

A template node will be created of type cq:Template with some properties that we have added until Step 6.

Restrict usage of template 
You may want to restrict usage of template by author , For Example 

  • A product page should never be created as home page.
  • A homepage should never be created under products page.
  • A page can only be created under path /content/training/en/.


allowedPath : Path of a page that is allowed to be based on this template.
allowedParents : Path of a template that is allowed to be a parent of this template.
allowedChildren : Path of a template that is allowed to be a child of this template.

Some common regex for restrictions.

  • /content : Restrict creation of page only under content node.
  • /content(./*)? :Restrict creation under content node and it's child node
  • /content/training : Restrict creation of page under /content/training node only , Template will not be available at /content node or for child nodes of training.
  • /content/training(./*)? : Restrict creation of page under training node under content and child node.


Adding Thumbnail to Template

Thumbnail of template is defined by thumbnail.png node inside template node.
To show a thumbnail for page/template , either you can create a new thumbnail node for template node and add images of different renditions OR you can easily generate thumbnail for a page and use the node structure for template. 


Step 1. Select the page created by the template
Step 2. Click on view properties in Touch UI
Step 3. Go to Thumbnail tab and upload an image or generate a preview from page content.

Go to CRXDe and go to the page which you have created , You will find node named 'file' containing dam:thumbnails. 


Step 4. Copy file node and paste it at /apps/training/templates/basicartile/jcr:content
Step 5. Rename file node to thumbnail.png so that AEM can recognize this node as thumbnail as shown below.


Now create page wizard will show you a template with thumbnail and  the pages created with the template as well.


Dhanywad !


Monday, 28 March 2016

Simply Sightly


Namastey,

  • Sightly means "pleasing to eyes"
  • It is new and powerful HTML templating language used in AEM. 
  • It is expected to be a replacement of JSP and ECMA script, however you will not be able to write complex code using sightly.  
  • The expressiveness of sightly is intentionally limited as you should be using real programming languages like Java to write complex code.Although you can easily pass inputs via sightly to Java code and also easy to use output from Java code in front-end using Sightly.


Code Syntax : 

   1.   Sightly code is written using dollar sign '$' and braces '{}' ,
         e.g ${currentPage.title} where currentPage is a global object and title is a variable.
       
           You can use global objects as listed in [0]


   2.  You can add sightly as an attribute to any HTML element. In this case dollar sign and braces are not required.
        e.g  < div data-sly-include="main.html"/>   where data-sly is used to indicate sightly language and include is action.


Dhanywaad,

[0] https://docs.adobe.com/docs/en/aem/6-0/develop/sightly/global-objects.html

Tuesday, 7 July 2015

Adding newly created component in sidekick / siderail

Namastey, 

Creating a component is not enough if it cannot be used on the pages. In order to display the component on the page we have following two ways :
  1. Directly include the component on page rendering jsp/sightly as shown below
<cq:include path="comp1" resourceType="mySite/components/myComp" />

  2. Enable the component in sidekick and then drag it to the parsys to use it.
        Only those component which has either cq:inplaceEditing node or  cq:dialog node can be enabled to appear in sidekick,because a component is logically not needed if author doesn't input any content to it.

    Now component is available but still we need to enable it to see in sidekick:

  1. 1. Go to design view of page ( available only in classic UI ).
  2. 2. Go to 'Edit' of parsys on which you want to drag -drop your component.
  3. 3. List of available components will show up , you can check your component to show up in sidekick.
  4. 4. Exit the pop-up and you will see the checked component showing up in sidekick.
Dhanywaad !


Basic Sling Model Exporter

/* Open a page which is having component /apps/project/components/page/page /content/project/en/jcr:content.model.json Don't miss...