Namastey,
Defining Templates
Label : Name of the node
Step 5 .Click Next and Enter allowedParents : /content(./*)?
Step 6. Click Next , Next & Finish.
A template node will be created of type cq:Template with some properties that we have added until Step 6.
Restrict usage of template
You may want to restrict usage of template by author , For Example
allowedPath : Path of a page that is allowed to be based on this template.
allowedParents : Path of a template that is allowed to be a parent of this template.
allowedChildren : Path of a template that is allowed to be a child of this template.
Some common regex for restrictions.
Adding Thumbnail to Template
Thumbnail of template is defined by thumbnail.png node inside template node.
To show a thumbnail for page/template , either you can create a new thumbnail node for template node and add images of different renditions OR you can easily generate thumbnail for a page and use the node structure for template.
Step 1. Select the page created by the template
Step 2. Click on view properties in Touch UI
Step 3. Go to Thumbnail tab and upload an image or generate a preview from page content.
Go to CRXDe and go to the page which you have created , You will find node named 'file' containing dam:thumbnails.
Step 4. Copy file node and paste it at /apps/training/templates/basicartile/jcr:content
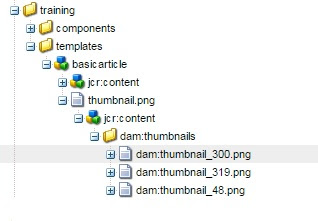
Step 5. Rename file node to thumbnail.png so that AEM can recognize this node as thumbnail as shown below.

Now create page wizard will show you a template with thumbnail and the pages created with the template as well.
Dhanywad !
Defining Templates
- A template is the basis of a page.
- A Template is like a stencil or frame or blueprint which is used to create multiple pages with same page structure.
- Template defines which components can be added on the created page.
- All the pages having same template is going to have same design.
Steps to create a template
Step 1. Open CRXDE Lite ( http://localhost:4502/crx/de)
Step 2. Go to your project folder or create one ( E.g / apps/training )
Step 3. Create a folder to organise all templates ( E.g templates )
Step 4. Right click and select "create template "
Label : Name of the node
Title : Name of the template
ResourceType : Location of page component which will be used to render the page
Ranking : Order of the template which will be visible to Author.
ResourceType : Location of page component which will be used to render the page
Ranking : Order of the template which will be visible to Author.
Step 5 .Click Next and Enter allowedParents : /content(./*)?
Step 6. Click Next , Next & Finish.
A template node will be created of type cq:Template with some properties that we have added until Step 6.
Restrict usage of template
You may want to restrict usage of template by author , For Example
- A product page should never be created as home page.
- A homepage should never be created under products page.
- A page can only be created under path /content/training/en/.
allowedPath : Path of a page that is allowed to be based on this template.
allowedParents : Path of a template that is allowed to be a parent of this template.
allowedChildren : Path of a template that is allowed to be a child of this template.
Some common regex for restrictions.
- /content : Restrict creation of page only under content node.
- /content(./*)? :Restrict creation under content node and it's child node
- /content/training : Restrict creation of page under /content/training node only , Template will not be available at /content node or for child nodes of training.
- /content/training(./*)? : Restrict creation of page under training node under content and child node.
Adding Thumbnail to Template
Thumbnail of template is defined by thumbnail.png node inside template node.
To show a thumbnail for page/template , either you can create a new thumbnail node for template node and add images of different renditions OR you can easily generate thumbnail for a page and use the node structure for template.
Step 1. Select the page created by the template
Step 2. Click on view properties in Touch UI
Step 3. Go to Thumbnail tab and upload an image or generate a preview from page content.
Go to CRXDe and go to the page which you have created , You will find node named 'file' containing dam:thumbnails.
Step 4. Copy file node and paste it at /apps/training/templates/basicartile/jcr:content
Step 5. Rename file node to thumbnail.png so that AEM can recognize this node as thumbnail as shown below.

Now create page wizard will show you a template with thumbnail and the pages created with the template as well.
Dhanywad !


No comments:
Post a Comment